Black and white mosaic runner floor

| Room | Floor |
|---|---|
| Tile | Black and white hexagon mosaic with light veined field tile |
| Layout | Mosaic inset and straight field |
| Area | Ask us |
Waterproofing, tile and joints, planned as one wet-area assembly.
The first call is about the room, not a tile pattern. We ask whether this is a bathroom floor, a tub surround, a walk-in shower, or a full room, then ask what is changing around it. A new valve, niche, bench, curbless entry, floor drain, or heated floor can change the preparation sequence. Photos and approximate dimensions help us discuss access, existing finishes, and the decisions that need to be made before a written scope is prepared.
At the visit, we look for movement, low spots, cracked tile, loose underlayment, damaged framing, and signs that water has reached places it should not. Tile can hide a problem for a while, but it cannot make a flexible floor rigid or make a poorly sloped shower drain correctly. We separate cosmetic removal from substrate work so the scope says what is known, what must be opened, and what will be checked once demolition exposes the assembly.
Coastal rooms deserve ordinary moisture discipline, not a special sales story. Salt air and humidity do not automatically make a slab fail, but they can make wet materials stay damp longer and can accelerate deterioration where water is already getting behind a finish. Ventilation, sound backing, correctly treated penetrations, and movement accommodation matter more than a claim that one product solves every condition. We use the installed system and its manufacturer instructions as the controlling details.
Bathrooms also need a plan for the details that are easy to overlook. We mark the finished height before setting, coordinate tile thickness with thresholds and plumbing trim, and leave access to serviceable components where the design requires it. A niche gets a real slope at its sill, an outside corner gets a deliberate edge treatment, and a floor transition is checked against the adjoining finish. These small decisions reduce surprises at the end of the job and make the room easier to clean. They also give the written scope useful boundaries: tile installation is not silently expanded into plumbing, electrical, framing, painting, or fixture work that was never discussed.
A bathroom floor may need removal, patching, grinding, or a cementitious leveling material before tile is considered. We check the plane with a straightedge and identify abrupt transitions rather than burying them under thinset. Cement backer board and foam backer board are both useful systems, but they are not interchangeable by habit. Cement board is dense and familiar; foam board is light and can provide a purpose-built waterproof surface when its seams, fasteners, and transitions are treated as the system requires.
In a shower, the waterproof layer must be continuous across walls, corners, the curb, the niche, and every pipe or valve penetration. Tile, grout, and caulk are the visible finish; grout is not waterproofing. At a shower pan, we form the slope toward the drain and keep the drain connection compatible with the membrane. We do not cover a pan and call it ready without checking the required cure and test conditions.
A flood test holds water in the shower receptor for the required test period while the surrounding area is watched for leakage. It is a useful check of the pan and drain connection, not a substitute for correct wall waterproofing or careful detailing. The written scope can identify when the test happens, what must remain accessible, and which work waits for the result. If a hidden condition changes the sequence, we explain that before proceeding with the affected step.
Moisture management continues after installation. We keep the shower floor and wall junctions open to the movement and sealant details the system requires, avoid blocking weep paths at compatible drains, and do not use surface sealer as a substitute for a membrane. On a bathroom floor, we check the doorway and adjacent finish before the last row is fixed. These checks are small, but they connect the visible pattern to the parts that keep water from becoming a hidden maintenance problem.
Layout is decided from the room's actual reference lines. We look at the most visible wall, the doorway, the drain, plumbing fixtures, niches, and outside corners before choosing a starting line. The goal is not to eliminate every small cut; it is to keep cuts intentional, avoid awkward slivers, center the pattern where it matters, and carry grout joints cleanly around changes in plane. Large-format tile may need a flatter substrate, more care at corners, and a plan for handling edges.
Thinset selection follows the tile, substrate, location, and exposure. We mix it to the manufacturer's range and allow the proper slake and remix time when specified. Coverage is checked by lifting pieces during installation, especially in wet areas and under larger tile. Back-buttering can improve contact on the tile side, but it does not correct a hollow spot in the substrate. We keep mortar out of movement joints and protect the drain, trim, and finished surfaces while the setting bed firms up.
Lippage is managed through flatness, joint planning, tile handling, and an installation method suited to the tile. A leveling clip may assist with alignment, but it cannot flatten a wavy floor or replace coverage. Cuts around valves, corners, curbs, and niches are measured from the finished assembly, not guessed from a rough opening. We dry-check difficult pieces and keep the visible face clean so the final grout work is not asked to hide setting mistakes.
Grout color and joint width should suit the tile and the room's cleaning demands. Cementitious grout needs the correct water ratio, packing, wash, and cure. Premixed or specialty grout follows its own instructions. We keep changes of plane, inside corners, the tub-to-wall joint, and transitions available for flexible sealant rather than hard-grouting every intersection. Movement joints are part of the assembly's behavior; they are not decorative gaps to fill because a line looks unfinished.
Sealing is a separate decision from grouting. Some grout and tile need it, some do not, and the product instructions control. A sealer can reduce staining or simplify maintenance, but it does not make grout waterproof and it cannot repair a leaking shower. We remove haze carefully, protect adjacent finishes, and explain when the room can receive light use, when caulk needs to cure, and when a shower should wait longer before regular use.
The final walk-through checks tile bond and alignment, grout consistency, sealant joints, trim, transitions, drain flow, doors or hardware affected by the work, and cleanup. We point out maintenance joints and any care instructions that are specific to the selected tile or grout. The work process is intentionally plain: call, room review, written scope, protection and removal, preparation, waterproofing and test where required, setting, grout and seal, then a final check.
The exact scope depends on what the room reveals and what the written estimate records. These five work areas are the checkpoints we discuss rather than assumptions bundled into a vague installation label.
We discuss bathroom and shower tile installation in Seal Beach, Long Beach, Huntington Beach, Los Alamitos, and Lakewood. The same technical questions apply in each area: what is under the finish, where water is managed, how the room moves, and what the household needs to use again. Contact Los Angeles Tile Installer at (213) 325-3935 to talk through the room and request a written scope.
| Preparation | Protect access, remove agreed finishes, inspect the substrate, and correct unsuitable planes or transitions identified in the scope. |
|---|---|
| Membrane | Install the specified waterproofing system at shower walls, pans, curbs, niches, corners, and penetrations according to its instructions. |
| Setting | Establish the layout, mix compatible thinset, set tile with checked coverage, and form planned cuts, joints, edges, and transitions. |
| Grout | Fill the selected joints after the setting bed cures, keep movement and change-of-plane joints flexible, and clean the surface without over-washing. |
| Sealing | Apply sealer only where the selected tile or grout calls for it, then explain cure time, caulk care, cleaning, and shower-use timing. |
Typical days for each job. Your written estimate gives your dates.
These are typical medium-size working-day allowances, not promised dates. Curing, weekends and other waits may add elapsed time.
| Job | Stage | Working days |
|---|---|---|
| Kitchen backsplash | Prep and protect | 0.5 |
| Set tile | 1 | |
| Grout and caulk | 0.5 | |
| Seal after grout cures | 0.5 | |
| Bathroom floor | Remove old tile | 1 |
| Level and prep | 1 | |
| Set tile | 1 | |
| Grout | 1 | |
| Shower walls and pan | Demolition | 1 |
| Pan, curb and waterproofing | 1–2 | |
| Flood test | 1 | |
| Set tile | 2–3 | |
| Grout and seal | 1 | |
| Full bathroom | Demolition | 1–2 |
| Prep and waterproofing | 2 | |
| Flood test | 1 | |
| Set walls and floor | 3–4 | |
| Grout and seal | 1–2 | |
| Large open floor | Remove old flooring | 1–2 |
| Level and prep | 1–2 | |
| Set tile | 3–4 | |
| Grout | 1–2 |
The kitchen is typically usable from about day 2, before a later seal visit. A bathroom floor may be walked on about one more day after grouting; showering typically follows about three days after grouting, once cured. Light foot traffic on set floor areas may be possible after 24 hours. Confirm each return to use with the installer.
Sand: shorter path. Outline: longer path.
Scroll the days to see the full scale.
Working days only; curing and weekends add elapsed time.
Ask about these dates| Room | Floor |
|---|---|
| Tile | Black and white hexagon mosaic with light veined field tile |
| Layout | Mosaic inset and straight field |
| Area | Ask us |
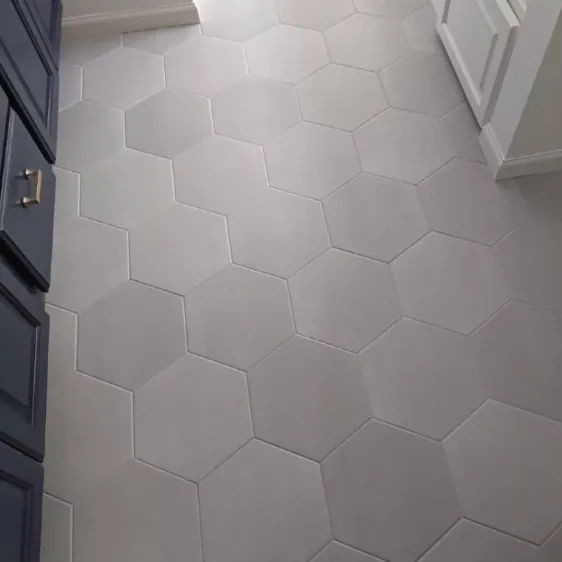
| Room | Bathroom |
|---|---|
| Tile | Gray hexagon floor tile and light tub surround |
| Layout | Hexagon floor tile |
| Area | Ask us |
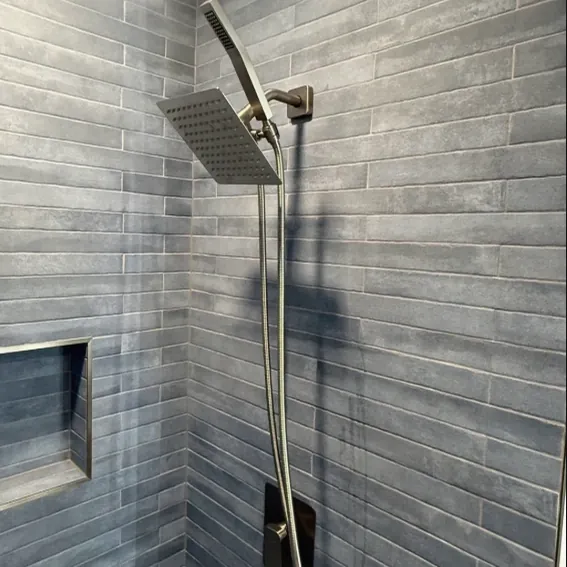
| Room | Shower |
|---|---|
| Tile | Narrow gray rectangular wall tile |
| Layout | Horizontal offset courses |
| Area | Ask us |
No. Grout is a joint finish, not the waterproofing layer. A shower needs a continuous waterproof assembly behind the tile, with treated corners, penetrations, curb, and pan.
When the shower design includes a receptor that can be tested, we plan a flood test after the pan waterproofing and drain connection are ready. Tile waits until the test and required cure conditions are complete.
Sometimes, but not by simply covering the crack. We identify whether the crack is in the tile, underlayment, slab, or framing, then select repair, isolation, or replacement based on the movement and the system requirements.
Neither is universally better. Cement board is a durable backing that still needs a compatible waterproofing method, while foam board can be a waterproof system when its seams and fasteners are treated correctly. The room and system details decide.
The answer depends on the membrane, thinset, grout, and caulk instructions. A typical scope separates setting and grouting from final cure, so shower use begins only after the specified waiting periods are met.