Fluted partition bathroom floor
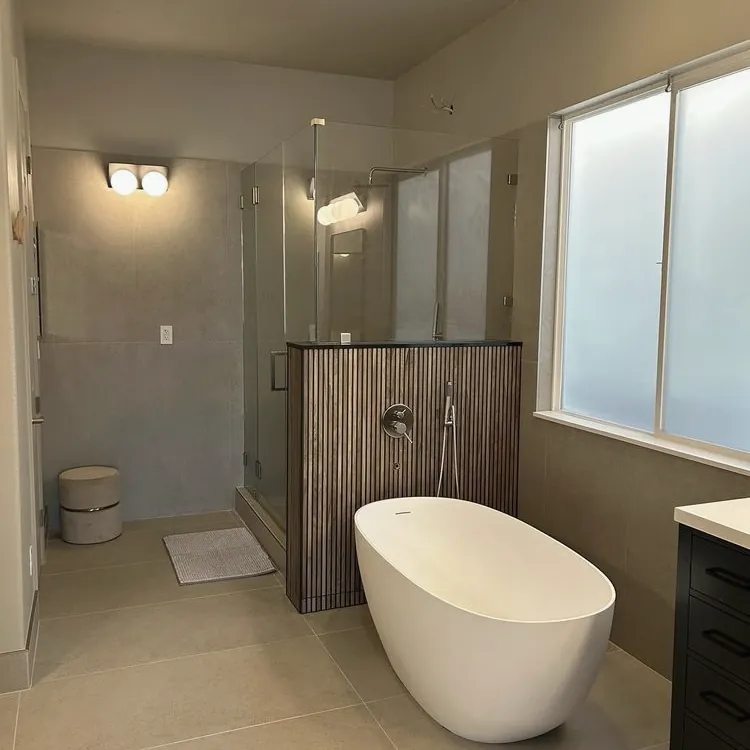
| Room | Bathroom |
|---|---|
| Tile | Light large-format floor tile |
| Layout | Straight grid floor |
| Area | Ask us |
Old finishes removed so the new base can be checked.
A new tile floor needs a surface that is clean, stable, and suitable for the setting material. Covering an old floor can sometimes work, but it is not a shortcut around movement, moisture, loose areas, or a height problem. Removal is usually the clearer path when existing tile is cracked in several places, sounds hollow, moves underfoot, has failed grout, or meets a new finish at an awkward elevation. It also makes sense when a bathroom has had a leak, when a shower assembly needs to be opened, or when the planned tile and layout require a different plane.
The first call is a conversation about the room, not a promise made from a photograph. We ask what is being removed, what finish is adjacent, whether plumbing or cabinets stay, and what access the crew will have. At the visit, we look for the likely substrate, transitions, low spots, cracks, soft framing, and signs of water. The written scope can then separate demolition from preparation and setting, so an unforeseen condition is discussed before it becomes hidden beneath the new work.
Removal starts with protection. We isolate the work area as the room allows, protect paths and surfaces that remain, and work in manageable sections rather than treating the room as one large impact zone. Tile, mortar, adhesive, underlayment, base material, and fasteners are removed only as far as the agreed scope requires. Around cabinets, door jambs, tubs, thresholds, and walls, careful hand work can matter more than speed because the edge is where a new floor must meet something that is not being replaced.
Dust and debris are part of demolition, so the plan should say how the crew will contain and remove them. We keep the work area orderly, collect sharp fragments, and identify anything that cannot be removed without changing the scope. If the existing assembly is bonded to a slab or a framed floor, the removal method changes. A thin adhesive residue may be suitable for mechanical preparation; a damaged or unstable layer may need to come out. The goal is not to make every substrate look identical. The goal is to expose the surface that the next system can properly use.
Once the finish is open, we check more than whether the floor looks clean. A concrete slab is reviewed for cracks, hollow patches, contaminants, and changes in level. A framed floor is reviewed for movement, damaged underlayment, fastener patterns, and areas that flex. In a wet room, we look at the shower base, curb, corners, penetrations, and wall surfaces as a connected assembly. A crack in the tile may be a tile problem, but it may also be the visible result of movement below it.
Coastal humidity and salt air are part of the setting, but salt air alone does not automatically mean a slab is unsound. We still rely on what the substrate shows and on appropriate moisture checks when conditions call for them. A surface with oil, paint, curing residue, loose adhesive, or excessive dust will not give thinset a reliable bond. We remove or mechanically prepare those contaminants, allow damp areas to dry when needed, and flag active water intrusion rather than sealing it inside a new finish.
Preparation is not the same as making every floor perfectly level. Tile needs a plane that is flat enough for the tile format and layout, with the intended slope preserved where water must drain. We identify high spots, low spots, abrupt transitions, and door clearances before selecting a correction. Cement-based patching or self-leveling materials may suit a stable concrete area when their installation requirements can be met. A foam or uncoupling product may be useful in a specified system, but it is not a universal substitute for structural repair or proper slope.
Crack-isolation or uncoupling membranes can help manage certain in-plane movements when the substrate and product requirements match. They do not make a moving floor stable, stop an active leak, or erase a structural problem. We follow the chosen membrane's treatment for seams, edges, penetrations, and mortar. At walls, changes of plane, and long uninterrupted runs, movement accommodation is considered rather than filling every gap with rigid grout. The preparation decision should be tied to the cause of the condition, not to a product name alone.
A shower is a waterproofing project with tile on the visible side. The membrane must form a continuous water-management layer at the pan, curb, corners, niches, benches, fastener penetrations, and plumbing openings. Tile and grout protect and finish the surface, but grout is not waterproof. We use the specified shower system, treat its transitions as directed, and keep the drain connection and slope in view while the assembly is built. If the existing waterproofing cannot be confirmed or does not fit the new layout, opening the area further is safer than assuming it is intact.
Where the shower design requires it, a flood test is completed before tile hides the work. The test checks the contained pan for loss over the specified test period; it is not a test of every wall surface or a substitute for inspecting the system. A bathroom floor outside the shower may need a different moisture strategy. Waterproofing should stop where the design requires it, while perimeter gaps, transitions, and movement joints remain detailed so water and movement have somewhere appropriate to go.
Before setting begins, the prepared surface is checked against the tile, room dimensions, and layout. We dry-plan key lines, consider where cuts land, and account for cabinets, drains, doorways, thresholds, and visible corners. Large-format tile is less forgiving of a wavy plane, so flatness and mortar coverage deserve attention before the first piece is placed. The setting material is selected for the substrate and tile, mixed as directed, and allowed the working time it needs rather than being stretched past its useful life.
Good coverage comes from the right mortar bed, consistent combing, and periodic checks. Back-buttering may be needed for larger tile or textured backs. We lift pieces during the work to verify contact, keep joints aligned, and control lippage without pretending that every handmade or irregular tile will read like a machine-made panel. Cuts are planned for balance and function. At the finish, grout color and joint width are treated as part of the layout, while caulk is used at changes of plane and other flexible joints where specified.
The exact sequence depends on the room and the condition uncovered after removal. A bathroom floor may need localized patching and a crack-isolation detail. A shower may need a new waterproofed pan, a flood test, and carefully coordinated wall and floor work. An open floor may need transitions and staged access so adjacent areas remain usable where possible. We discuss the condition that changes the scope before proceeding with work that was not included in the initial plan.
This service is available for projects in Seal Beach, Long Beach, Huntington Beach, Los Alamitos, and Lakewood. The same preparation principles apply across those areas, but each room still gets its own assessment. The shop is at 3020 Old Ranch Pkwy, Seal Beach, CA 90740. Call (213) 325-3935 to describe the room and arrange the next step.
The process starts with a phone conversation and, when useful, photographs or measurements. At the site visit, we confirm what stays, what is removed, how debris can leave, and which adjacent surfaces need protection. We look beneath the visible finish as far as the planned removal allows. The written scope identifies demolition, substrate preparation, leveling, membrane or waterproofing work, setting, grouting, sealing, and any items that remain the owner's responsibility.
During the job, preparation is a checkpoint rather than a hidden phase. If the opened substrate reveals damage, an active moisture source, or a height conflict, we pause and explain the condition and options. After setting, the tile needs the appropriate cure time before grouting and normal use. Grout is not waterproof, and sealer is not a repair for movement or poor coverage. Final review covers joints, edges, transitions, cleanup, and care instructions for the installed materials.
| Preparation | Protection, removal and a clean, sound base as scoped. |
|---|---|
| Membrane | Waterproofing or crack isolation where the assembly requires it. |
| Setting | Layout, mortar coverage, cuts and movement provisions. |
| Grout | Compatible joints after the setting material has cured. |
| Sealing | Only where the actual stone, grout or joint detail calls for it. |
Typical days for each job. Your written estimate gives your dates.
These are typical medium-size working-day allowances, not promised dates. Curing, weekends and other waits may add elapsed time.
| Job | Stage | Working days |
|---|---|---|
| Kitchen backsplash | Prep and protect | 0.5 |
| Set tile | 1 | |
| Grout and caulk | 0.5 | |
| Seal after grout cures | 0.5 | |
| Bathroom floor | Remove old tile | 1 |
| Level and prep | 1 | |
| Set tile | 1 | |
| Grout | 1 | |
| Shower walls and pan | Demolition | 1 |
| Pan, curb and waterproofing | 1–2 | |
| Flood test | 1 | |
| Set tile | 2–3 | |
| Grout and seal | 1 | |
| Full bathroom | Demolition | 1–2 |
| Prep and waterproofing | 2 | |
| Flood test | 1 | |
| Set walls and floor | 3–4 | |
| Grout and seal | 1–2 | |
| Large open floor | Remove old flooring | 1–2 |
| Level and prep | 1–2 | |
| Set tile | 3–4 | |
| Grout | 1–2 |
The kitchen is typically usable from about day 2, before a later seal visit. A bathroom floor may be walked on about one more day after grouting; showering typically follows about three days after grouting, once cured. Light foot traffic on set floor areas may be possible after 24 hours. Confirm each return to use with the installer.
Sand: shorter path. Outline: longer path.
Scroll the days to see the full scale.
Working days only; curing and weekends add elapsed time.
Ask about these dates| Room | Bathroom |
|---|---|
| Tile | Light large-format floor tile |
| Layout | Straight grid floor |
| Area | Ask us |
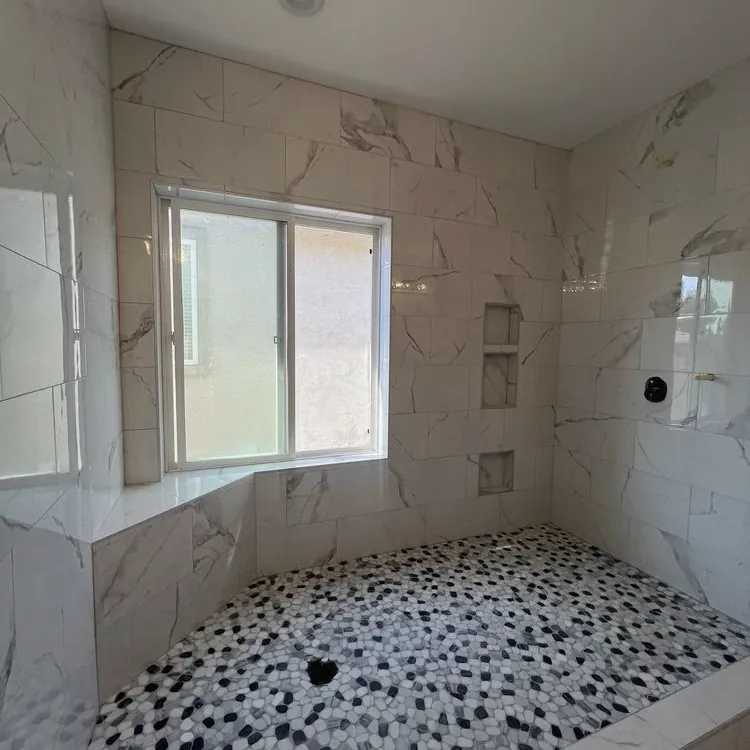
| Room | Shower |
|---|---|
| Tile | Light veined wall tile and black-and-white mosaic floor |
| Layout | Large-format wall tile and mosaic floor |
| Area | Ask us |

| Room | Bathroom |
|---|---|
| Tile | White veined wall tile and light mosaic floor |
| Layout | Large-format wall grid and mosaic shower floor |
| Area | Ask us |
Sometimes, but only when the existing tile is firmly bonded, clean, suitably flat, and compatible with the planned assembly. Removal is the better starting point when there is movement, moisture damage, height conflict, or uncertainty beneath the tile.
We check the exposed surface with straightedges and by looking at transitions, tile format, doors, and drainage. The correction may be localized patching, a broader cement-based product, or no leveling if the plane is already suitable.
No. A compatible membrane can help address certain in-plane substrate movement, but it cannot correct structural movement, an active leak, or an unstable floor. The substrate and product requirements have to match.
No. Waterproofing belongs behind the tile in a continuous shower system. Grout fills joints and finishes the surface, but it is not a substitute for a properly detailed membrane, drain, corners, and penetrations.
It depends on demolition, substrate repairs, tile size, waterproofing, cure times, and access. A written scope can give typical working-day stages after the room and existing assembly have been inspected.